顯示具有 MVVM 標籤的文章。 顯示所有文章

2.16.2021

.Net Desktop Skeleton

.Net Desktop UI Skeleton Project

Recently I created two skeleton project for c# desktop environment,

Prism is WPF only, but ReactiveUI can use with WPF and WinForm.

The prism skeleton is based on prism template pack, but I upgrade the prism version to v8.0.

Prism Shell

ReactiveUI Shell

How To Start

Cloning the repository, either Prism or ReactiveUI

  1. Clone this repository:
    1. Prism: git clone https://github.com/liaochihung/PrismBlankApp.git your-project-name
    2. ReactiveUI git clone https://github.com/liaochihung/ReactiveUIBlankApp.git your-project-name
  2. Move to the project directory: cd your-project-name
  3. Create your own repository and cleaning the bootstrap project history:
    1. Remove previous Git history in order to do not add the bootstrap repo noise in your project: rm -rf .git
    2. Initialize your own Git repository: git init
    3. Add the bootstrap files: git add .
    4. Commit
    5. Add your remote repository: git remote add origin git@github.com:your-name/your-project-name
    6. Upload your local commits to the new remote repo: git push -u origin master
  4. Start coding!

Written with StackEdit.

8.20.2017

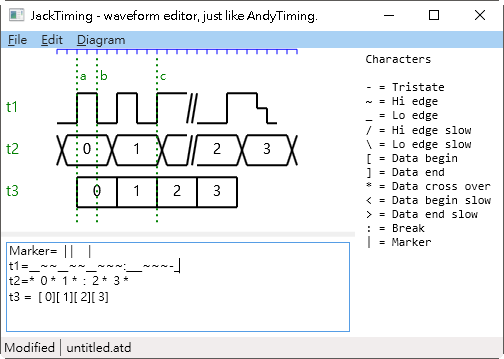
最近寫了一個仿AndyTiming的程式

新工作下班後比較閒,又剛好需要畫一些簡單的時序圖,找了AndyTiming來用,可惜在Windows 10中會有字元無法顯示,順便自己寫了一個,放在GitHub,會持續更新。

介面如下(基本上就和AndyTiming一樣XD):
Screen Shot1

Written with StackEdit.

7.10.2017

在Xamarin.Forms上的MVVM

ReactiveUI

最近在看Xamarin.Forms的MVVM framework,個人徧好ReactiveUI,於是找到了這篇介紹 –
A Simple Vocabulary App Using ReactiveUI and Xamarin Forms,它實作了一個猜字的遊戲,如下圖:
enter image description here

基本上它使用的方式和在Windows平台上沒有什麼差別,仍是focus在view和viewmodel的互動,沒有其它的東西,如頁面的routing、Navigation、IoC的使用等。

此程式主要的動作在WordPickViewModel中:

public WordPickViewModel(IWordRepository wordRepository)
{
    _wordRepository = wordRepository;
    WordOptions = new ObservableCollection<WordOption>();
    CorrectPct = "0%";

    // 設定狀態的條件,型別為IObservable<bool>
    var canRetrieve = this.WhenAnyValue(x => x.CanRetrieve).Select(x => x);
    var canSelect = this.WhenAnyValue(x => x.CanRetrieve).Select(x => !x);

    // 原文使用CreateAsyncTask,目前版本v7.4,要改用如下函式
    // 定義命令,此命令完成後會回傳一List<WordOption>>
    RetrieveWordCommand = ReactiveCommand.CreateFromTask<List<WordOption>>(async (arg) =>
    {
        var wordResults = await _wordRepository.GetWords(_rangeFloor, RangeCeiling);

        return wordResults.Select(wr =>
            new WordOption
            {
                Word = wr.Name,
                Definition = wr.Definition,
                WordId = wr.Id
            }).ToList();
    }, canRetrieve);

    // 原文使用CreateAsyncTask,目前版本v7.4,要改用如下函式
    SelectAnswerCommand = ReactiveCommand.CreateFromTask(async arg =>
    {
        await HandleItemSelectedAsync(arg);
    }, canSelect);

    // ObserveOn表示後續動作會在其指定的執行緒上被執行
    // Subscribe定義命令完成後的處理
    RetrieveWordCommand
        .ObserveOn(RxApp.MainThreadScheduler)
        .Subscribe(wordOptions =>
        {
            _timerCancellationToken = new CancellationTokenSource();
            NextRange();
            CanRetrieve = false;
            WordOptions.Clear();

            // randomly determine the word to challenge user with
            var rand = new Random();
            var challengeWord = wordOptions[rand.Next(wordOptions.Count)];
            ChallengeWord = $"\"{challengeWord.Word}\"";

            foreach (var item in wordOptions)
            {
                var isAnswer = item.WordId == challengeWord.WordId;
                item.IsAnswer = isAnswer;
                item.Image = isAnswer ? "check.png" : "x.png";
                WordOptions.Add(item);
            }

            TimerCountdown = 10;
            Device.StartTimer(new TimeSpan(0, 0, 1), () =>
            {
                if (_timerCancellationToken.IsCancellationRequested)
                {
                    return false;
                }

                if (TimerCountdown == 0)
                {
                    ProcessAnswer();
                    return false;
                }
                TimerCountdown--;
                return true;
            });
        });

    //Behaviors
    this.WhenAnyValue(x => x.Begin).InvokeCommand(RetrieveWordCommand);
}

不過程式中對xaml頁面的部份,都是用code behind中的程式碼產生,View和ViewModel的綁定也是,個人比較不建議這個方式,這讓xaml的優勢不再。

xamvvm

這個輕量級的framework填補了ReactiveUI缺少的部份,因此兩個可以一起合用

Prism

Xarmin.Forms上的Prism不像WPF環境下那麼龐大,它精簡了很多,當然也比ReactiveUI完整多了,若是需要可以互相配合使用。

這邊有一個不錯的教學影片可參考.。

MVVMLight

在學Wpf時主要都是使用這一個,在Xamarin.Forms上它也滿適合的,輕量且剛剛好的功能,作者也寫了一個跨平台的範例程式,另在channel9有影片介紹

另有以此為基礎的延伸框架:

Xarch-starter

可以把它當作基楚的樣板來擴充,wiki中也提到了另一個更進階的框架 - Exrin,也可以參考看看…

這些framework都滿足了最基本的需求,不過大部份的說明文件都不甚豐富,想要應用都需要一點時間;當然也可以不依靠這些framework,之前在學wpf時就看過一系列的教學沒有應用任何framework,不過後來程式一步步擴大,不斷的重構後就出來了另一個框架了,就學習層面來說這很不錯,但還是要看個人的取舍了XD。

Written with StackEdit.

5.18.2017

Observable microservice bus

最近發現一個Rx的應用 – Obvs函式庫,作者用Rx的方式包裝了一些訊息傳輸用的函式庫,目前提供的擴充有:

  • Transports: ActiveMQ / RabbitMQ / NetMQ / AzureServiceBus / Kafka / EventStore
  • Serialization: XML / JSON.Net / NetJson / ProtoBuf / MsgPack
  • Logging: NLog / log4net
  • Monitoring: Performance Counters / ElasticSearch
  • Integrations: Slack

Rx的訂閱特性非常適合用在訊息系統上,而作者進一步的包裝了不同的訊息函式庫,對於一般的需求來說應該是夠用了。

範例

P.S 以下說明來自專案github

定義預提供服務的訊息介面:

public interface IMyServiceMessage : IMessage { }

可建立不同需求的訊息類型:

public class MyCommand : IMyServiceMessage, ICommand { }

public class MyEvent : IMyServiceMessage, IEvent { }

public class MyRequest: IMyServiceMessage, IRequest { }

public class MyResponse : IMyServiceMessage, IResponse { }

建立訊息服務:

IServiceBus serviceBus = ServiceBus.Configure()
    .WithActiveMQEndpoints<IMyServiceMessage>()
        .Named("MyService")
        .UsingQueueFor<ICommand>()
        .ConnectToBroker("tcp://localhost:61616")
        .SerializedAsJson()
        .AsClientAndServer()
    .Create();

傳送命令:

serviceBus.Commands.Subscribe(c => Console.WriteLine("Received a command!"));
await serviceBus.SendAsync(new MyCommand());

發佈事件:

serviceBus.Events.Subscribe(e => Console.WriteLine("Received an event!"));
await serviceBus.PublishAsync(new MyEvent());

請求/回應:

serviceBus.Requests
      .OfType<MyRequest>()
      .Subscribe(request => serviceBus.ReplyAsync(request, new MyResponse()));

serviceBus.GetResponses(new MyRequest())
      .OfType<MyResponse>()
      .Take(1)
      .Timeout(TimeSpan.FromSeconds(1))
      .Subscribe(r => Console.WriteLine("Received a response!"), err => Console.WriteLine("Oh no!"));

定義自訂的端點以包裝函式呼叫或和其它系統整合:

public class MyCustomEndpoint : IServiceEndpointClient
{
    Type _serviceType = typeof(IMyCustomServiceMessage);

    public IObservable<IEvent> Events
    {
            get
            {
                // subscribe to external MQ broker
            }
    }

    public Task SendAsync(ICommand command)
    {
            // call external API
    }

    public IObservable<IResponse> GetResponses(IRequest request)
    {
            // call external API and wrap response in observable
    }

    public bool CanHandle(IMessage message)
    {
            return _serviceType.IsInstanceOfType(message);
    }
}

...

IServiceBus serviceBus = ServiceBus.Configure()
    .WithActiveMQEndpoints<IMyServiceMessage>()
        .Named("MyService")
        .UsingQueueFor<ICommand>()
        .ConnectToBroker("tcp://localhost:61616")
        .SerializedAsJson()
        .AsClientAndServer()
    .WithEndpoints(new MyCustomEndpoint())
    .Create();

在各個mvvm framework中,都不約而同的提供了集中式的訊息架構,以利各個viewmodel及view之間的溝通,如Prism的Event Aggregator、MvvmLight的Messenger、及ReactiveUI中的MessageBus,在使用上述這些framework時也很適合使用此 ServiceBus 替換,減少學習不同功能類似的工具的時間花費。

Written with StackEdit.

11.24.2016

WinForm表單控制項狀態管理 - MVVM(with ReactiveUI) way

用物件導向工具開發程式1

最早最早,所有code都寫在Form中時,狀態的變更,落在各個被觸發的事件中,假設目前我們有一個TextBox,一個Button,程式需求TextBox中至少要n個字元才可以觸發Button的Click事件,於是我們在TextBox的TextChanged事件中加上判斷,再設定按鈕Enabled,搞定。

但事情發生在多個控制項,多個狀態時,複雜度隨之而來。

開發物件導向程式

於是,換個方向,使用狀態Property,在它的setter中寫判斷邏輯,看起來很好,但還是跟Form綁太緊了。尋找進階版,Mediator浮現,嗯嗯,符合SRP原則,可是好像不夠OCP,沒關係,再抽象一次…
發現有人寫好了(UI State Synchronization of WinForm Controls)

_stateManager
    .AddCommand(CMD_INDEX_CHECKING, UIObject.CreateObject(this.btnRemTarget));
_stateManager
    .AddCommand(CMD_INDEX_CHECKING, UIObject.CreateObject(this.btnSpiralTest));
_stateManager
    .AddCommand(CMD_INDEX_CHECKING, UIObject.CreateObject(this.btnIndexCheck));

_stateManager
    .AddCommand(CMD_SPIRAL_CHECKING, UIObject.CreateObject(this.btnRemTarget));
_stateManager
    .AddCommand(CMD_SPIRAL_CHECKING, UIObject.CreateObject(this.btnSpiralTest));
_stateManager
    .AddCommand(CMD_SPIRAL_CHECKING, UIObject.CreateObject(this.btnIndexCheck));

UI層的狀態維護,交給Mediator負責,而這個可重用的Mediator中透過字典記錄使用者定義的命令及相對應的控制項,並依需要設定控制項的狀態,這種方式下再配合Model-View-Presenter模式,UI和Presenter不再耦合,Presenter中也不用再出現WinForm相關的參考,perfect!

那…為什麼要ReactiveUI?

因為它支援.Net目前大多數的Presentation,in MVVM way.
GitHub測試

View

var context = SynchronizationContext.Current;
VM = new ViewModel2(
    context,
    this.WhenAnyValue(x => x.textBox1.Text),
    this.WhenAnyValue(x => x.textBox2.Text)));

// bind ViewModel's property to control
this.Bind(VM, x => x.UserName, x => x.textBox1.Text);
this.Bind(VM, x => x.Password, x => x.textBox2.Text);

// extra bind, let a property in ViewModel determinate the state of a control
VM.CanUserLogin.BindTo(this, x => x.btnLogin.Visible);

ReactiveUI提供了一個額外的綁定功能,如上將CanUserLogin綁定至控制項的屬性中。而其它的Bind動作,若是在xaml系的表單上,可以直接指定。

ViewModel, 實作商業邏輯

name.ToProperty(this, x => x.UserName, out _userName);
password.ToProperty(this, x => x.Password, out _password);

CanUserLogin = this.WhenAnyValue(
    x => x.UserName, x => x.Password,
    (user, pass) =>
        !string.IsNullOrWhiteSpace(user) &&
        !string.IsNullOrWhiteSpace(pass) &&
        user.Length >= 2 && pass.Length >= 3)
    .DistinctUntilChanged();

Written with StackEdit.