之前找到的NetMQ範例,趁有時間邊翻譯邊學習,此譯文略過前面介紹Rx的部份(有興趣可參考IntroToRx,或是我之前翻譯的中文版),僅從原文中的General Idea開始。文章覺得不重要的或是不會翻的XD,會以
…代替。
另原文採用NetMQ 3.x版,當前版本4.x後有多項更新,若是需要,可參照此文的方式升級,但升級後在NetMQHeartBeatClient.cs的ShimHandler建構式要修改,斷線訊息才能正常顯示(或者我再找時間把升級後的版本放上去XD已fork並更新,網址:https://github.com/liaochihung/NetMQRxDemo)…// 要加上parent參數,當然,在呼叫時要帶入 public ShimHandler(object parent,Subject<ConnectionInfo> subject, string address) { this.address = address; this.subject = subject; // 原專案中忘了呼叫此函式 Initialise(parent); }
- 我之前有翻譯過NetMQ的中文化文件,有需要也可參考。
- Client - Server的程式,一般可能都會在client端採用輪詢的方式Pull server的資料,但請注意本文中使用Rx,所以它是相反方向的Push式的模式,在瞭解程式時請謹記此點。
- 此專案的原始範本:SignalR + Rx(跨平台) – ReactiveTrader。
General Idea
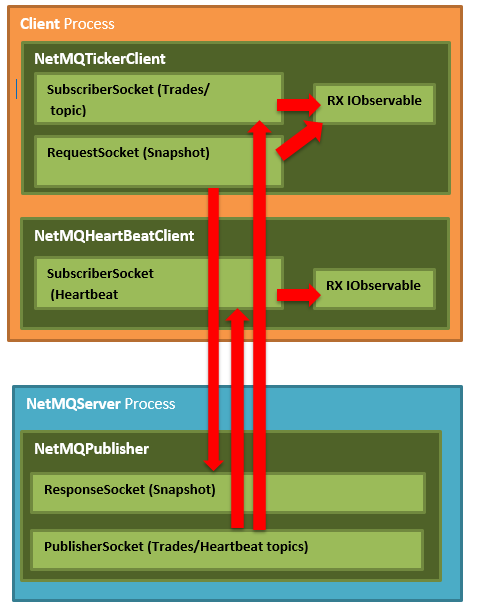
千言萬語不如圖一張:
The Publisher

Publisher由數個部份組成,下文會說明,但要記住server和client都是使用NetMQ,所以在你開始閱讀前先瞭解下NetMQ會比較好。…
IOC
…
MainWindow
除了以下幾個控制項外,這個window沒有其它需說明的:
- Start NetMQ:啟始NetMQPublisher Actor PublisherSocket(對模擬NetMQ server的崩潰/重啟很有幫助)
- Stop NetMQ:結束
NetMQPublisher Actor(對模擬NetMQ server的崩潰/重啟很有幫助) - Start Auto Ticker Data:以固定的時間間隔從NetMQPublisher Actor推送隨機產生的
TickerDto物件 - Stop Auto Ticker Data:會暫停從NetMQPublisher Actor推送
TickerDto物件 - Send One Ticker:從NetMQPublisher Actor推送單一的隨機
TickerDto物件
現在還不用擔心我們提到的“Actor”是什麼意思,很快就會說明。
MainWindowViewModel
MainWindowViewModel只是用來傳送命令給不管是停止/建立NetMQPublisher Actor,或是告訴NetMQPublisher Actor去做一些事,以下是其完整的程式碼。
using System;
using System.Collections.Generic;
using System.Linq;
using System.Text;
using System.Threading;
using System.Threading.Tasks;
using System.Windows.Forms;
using System.Windows.Input;
using Common.ViewModels;
using log4net;
using NetMQServer.Ticker;

namespace NetMQServer
{
    public class MainWindowViewModel
    {
        private readonly ITickerPublisher tickerPublisher;
        private readonly ITickerRepository tickerRepository;
        private Random rand;
        private static readonly ILog Log = LogManager.GetLogger(typeof(MainWindowViewModel));
        private CancellationTokenSource autoRunningCancellationToken;
        private Task autoRunningTask;
        private bool serverStarted;
        private bool autoTickerStarted;

        public MainWindowViewModel(ITickerPublisher tickerPublisher, ITickerRepository tickerRepository)
        {
            this.tickerPublisher = tickerPublisher;
            this.tickerRepository = tickerRepository;
            this.rand = new Random();

            serverStarted = false;
            autoTickerStarted = false;

            AutoTickerStartCommand = new DelegateCommand(
                AutoRunning,
                () => serverStarted && !autoTickerStarted);

            AutoTickerStopCommand = new DelegateCommand(
                () =>
                {
                    if (autoRunningCancellationToken != null)
                    {
                        autoRunningCancellationToken.Cancel();
                        autoRunningTask.Wait();
                        autoTickerStarted = false;
                    }
                },
                () => serverStarted && autoTickerStarted);

            SendOneTickerCommand = new DelegateCommand(
                SendOneManualFakeTicker,
                () => serverStarted && !autoTickerStarted);

            StartCommand = new DelegateCommand(
                StartServer,
                () => !serverStarted);

            StopCommand = new DelegateCommand(
                StopServer,
                () => serverStarted);
        }

        public DelegateCommand AutoTickerStartCommand { get; set; }
        public DelegateCommand AutoTickerStopCommand { get; set; }
        public DelegateCommand SendOneTickerCommand { get; set; }
        public DelegateCommand StartCommand { get; set; }
        public DelegateCommand StopCommand { get; set; }

        public void Start()
        {
            StartServer();
        }


        private void AutoRunning()
        {
            autoTickerStarted = true;
            autoRunningCancellationToken = new CancellationTokenSource();
            autoRunningTask = Task.Run(async () =>
            {
                //Publisher is not thread safe, so while the auto ticker is
                //running only the autoticker is allowed to access the publisher
                while (!autoRunningCancellationToken.IsCancellationRequested)
                {
                    SendOneManualFakeTicker();

                    await Task.Delay(20);
                }
            });
        }

        private void SendOneManualFakeTicker()
        {
            var currentTicker = tickerRepository.GetNextTicker();

            var flipPoint = rand.Next(0, 100);

            if (flipPoint > 50)
            {
                currentTicker.Price += currentTicker.Price / 30;
            }
            else
            {
                currentTicker.Price -= currentTicker.Price / 30;
            }

            tickerRepository.StoreTicker(currentTicker);

            tickerPublisher.PublishTrade(currentTicker);
        }

        private void StartServer()
        {
            serverStarted = true;
            tickerPublisher.Start();
            AutoRunning();
        }

        private void StopServer()
        {
            if (autoTickerStarted)
            {
                autoRunningCancellationToken.Cancel();

                // Publisher is not thread safe, so while the auto ticker is
                // running only the autoticker is allowed to access the publisher.
                //Therefore before we can stop the publisher we have to
                // wait for the autoticker task to complete
                autoRunningTask.Wait();
                autoTickerStarted = false;

                autoRunningCancellationToken = null;
                autoRunningTask = null;
            }
            tickerPublisher.Stop();

            serverStarted = false;
        }
    }
}
NetMQ Actors
在我們深入了解NetMQPublisher的工作原理之前,值得一提的是server和client都使用NetMQ的Actor模型,我很高興看到這個,因為這部分是由我撰寫的,也因此我認識了Somdoron。
你可以把Actor想成一個可以傳送訊息(命令)的socket,在Actor的內部使用了一個特殊的PairSocket,當你傳送訊息(命令)至Actor時,其實你是對其中一個pair寫入,而同時,Actor內部的另一個PairSocket可能正接收來自另一端的命令,且會執行此命令所相對應的動作。
你實際上要做的是在你的命令的來源和Actor間訂製一個簡單的協定。此協定可能包含要請Actor做的事情,或一個告知Actor去停止它所做的任何事情(因為常常需要,所以NetMQ提供了此命令 – ActorKnownMessages.END_PIPE(譯者注:原文採用NetMQ3.x版,目前新版4.x要改用NetMQActor.EndShimMessage))。
現在你可能會想知道為什麼我們選擇使用這個Actor模型?這很簡單,使用Actor模型可確保不會有任何關於lock的問題,因為根本就沒有資料共享,資料是通過socket發送的,且Actor保證會有自己的資料副本,因此不需要lock,也就不需要等待lock,這有助於讓事情簡單快速且又執行緒安全。
你可以在以下blog文章深入瞭解:#7:Simple Actor Model。
Start The Publisher
我們在MainWindowViewModel上看到了其包含啟動/停止NetMQPublisher的命令,但是它們到底作了什麼?怎麼做的?
Start函式本身很簡單,在NetMQPublisher中它只是建立了一個actor以接收命令。
public void Start()
{
    actor = new Actor<object>(context, new ShimHandler(context, tickerRepository), null);
}
Who Does The Streaming To The Clients?
我們剛剛討論到的NetMQPublisher做了所有的工作,以下為程式碼:
NetMQPublisher實際上作了如下事情:
1. 送出一個快照以回應(籍由ResponseSocket)來自client端所初始化的請求(籍由RequestSocket)。
2. 發佈(籍由PublisherSocket)”Trades”給所有已連線且訂閱了”Trades”主題的client端。
3. 發佈(籍由PublisherSocket)”HB”給所有已連線且訂閱了”HB”主題的client端。
using System;
using System.Collections.Generic;using System.Linq;
using System.Text;
using System.Threading.Tasks;
using System.Windows.Navigation;
using Common;
using NetMQ;
using NetMQ.Actors;
using NetMQ.InProcActors;
using NetMQ.Sockets;
using NetMQ.zmq;
using Newtonsoft.Json;
using Poller = NetMQ.Poller;

namespace NetMQServer.Ticker
{
    public class NetMQPublisher : ITickerPublisher
    {
        private const string PublishTicker = "P";

        public class ShimHandler : IShimHandler<object>
        {
            private readonly NetMQContext context;
            private PublisherSocket publisherSocket;
            private ResponseSocket snapshotSocket;
            private ITickerRepository tickerRepository;
            private Poller poller;
            private NetMQTimer heartbeatTimer;

            public ShimHandler(NetMQContext context, ITickerRepository tickerRepository)
            {
                this.context = context;
                this.tickerRepository = tickerRepository;
            }

            public void Initialise(object state)
            {

            }

            public void RunPipeline(PairSocket shim)
            {
                publisherSocket = context.CreatePublisherSocket();
                publisherSocket.Bind("tcp://*:" + StreamingProtocol.Port);

                snapshotSocket = context.CreateResponseSocket();
                snapshotSocket.Bind("tcp://*:" + SnapshotProtocol.Port);
                snapshotSocket.ReceiveReady += OnSnapshotReady;

                shim.ReceiveReady += OnShimReady;

                heartbeatTimer = new NetMQTimer(StreamingProtocol.HeartbeatInterval);
                heartbeatTimer.Elapsed += OnHeartbeatTimerElapsed;

                shim.SignalOK();

                poller = new Poller();
                poller.AddSocket(shim);
                poller.AddSocket(snapshotSocket);
                poller.AddTimer(heartbeatTimer);
                poller.Start();

                publisherSocket.Dispose();
                snapshotSocket.Dispose();
            }

            private void OnHeartbeatTimerElapsed(object sender, NetMQTimerEventArgs e)
            {
                publisherSocket.Send(StreamingProtocol.HeartbeatTopic);
            }

            private void OnSnapshotReady(object sender, NetMQSocketEventArgs e)
            {
                string command = snapshotSocket.ReceiveString();

                // Currently we only have one type of events
                if (command == SnapshotProtocol.GetTradessCommand)
                {
                    var tickers = tickerRepository.GetAllTickers();

                    // we will send all the tickers in one message
                    foreach (var ticker in tickers)
                    {
                        snapshotSocket.SendMore(JsonConvert.SerializeObject(ticker));
                    }

                    snapshotSocket.Send(SnapshotProtocol.EndOfTickers);
                }
            }

            private void OnShimReady(object sender, NetMQSocketEventArgs e)
            {

                string command = e.Socket.ReceiveString();

                switch (command)
                {
                    case ActorKnownMessages.END_PIPE:
                        poller.Stop(false);
                        break;
                    case PublishTicker:
                        string topic = e.Socket.ReceiveString();
                        string json = e.Socket.ReceiveString();
                        publisherSocket.
                            SendMore(topic).
                            Send(json);
                        break;
                }

            }
        }

        private Actor<object> actor;
        private readonly NetMQContext context;
        private readonly ITickerRepository tickerRepository;

        public NetMQPublisher(NetMQContext context, ITickerRepository tickerRepository)
        {
            this.context = context;
            this.tickerRepository = tickerRepository;
        }

        public void Start()
        {
            if (actor != null)
                return;

            actor = new Actor<object>(context, new ShimHandler(context, tickerRepository), null);
        }

        public void Stop()
        {
            if (actor != null)
            {
                actor.Dispose();
                actor = null;
            }
        }

        public void PublishTrade(TickerDto ticker)
        {
            if (actor == null)
                return;

            actor.
                SendMore(PublishTicker).
                SendMore(StreamingProtocol.TradesTopic).
                Send(JsonConvert.SerializeObject(ticker));
        }

    }
}
}在NetMQPublisher的Actor管道內部作的事是它建立了幾個額外的socket。
這些socket不是在Actor內部使用的,那些是您不會真正看到的專用的PairSocket pair,它們是NetMQ原始碼的一部分。我們在這裡討論的socket是用於應用程序邏輯的socket,在這個Demo程式中的應用如下所示:
一個PublisherSocket:這個socket是用來推送資料至客戶端的。NetMQ使用訊息框,如在第一段frame中放置主題,而之後才是實際的資料。這樣子客戶端(SubscriberSocket(s))就可以在處理訊息資料前先判斷此訊息是不是它們感興趣的。這一個PublisherSocket足夠用來服務多個主題了,你可以簡單的提供下列資訊給publisher:
- 訊息主題
- 實際訊息 透過NetMQPublisher來傳送特定訊息的範例如下:
public void PublishTrade(TickerDto ticker)
{
    actor.
        SendMore(PublishTicker).
        SendMore(StreamingProtocol.TradesTopic).
        Send(JsonConvert.SerializeObject(ticker));
}
實際上在這個範例中有如下兩個訊息被使用:
- TradesTopic (“Trades”):此主題使用單一NetMQPublisher中的PublisherSocket在已連接的客戶端上串流傳輸TickerDto物件。而在客戶端,他們使用一個SubscriberSocket,並將其主題設置為”Trades”,以便它們只接收來自NetMQPublisher PublisherSocket發佈者所發布的與”Trades”匹配的主題。
HeartbeatTopic (“HB”):此主題也使用單一NetMQPublisher中的PublisherSocket在已連接的客戶端上串流傳輸僅包含”HB”(訊息的內容不重要,僅注意主題名,因此客戶端可以看到一個新的”HB”訊息來了)主題的單一訊息幀。而在客戶端,他們使用一個SubscriberSocket,並將其主題設置為”HB”,以便它們只接收來自NetMQPublisher PublisherSocket發佈者所發布的與”HB”匹配的主題。所以實際上server端會初始化要推送的訊息,而客戶端會有一個HeartBeat主題的訂閱者,此訂閱者的程式中會有如下排程:
- 如果server(NetMQPublisher)依時間不斷地回應,此時雙方的通訊狀態會被認為是正常的。
- 如果server(NetMQPublisher)無法依時間不斷地回應,此時雙方的通訊狀態會被認為是有問題的。
2.一個ResponseSocket:這個socket是負責在client和server間傳送所有trades組成的快照,此快照為由發佈者行程所持有的儲存在記憶體中的一串
TickerRespository(只是一個由trades組成的佇列),Client應該包含有一個RequestSocket,而server(NetMQPublisher)應包含一ResponseSocket。所以client會初始化並傳送一訊息(訊息內容不重要),且會期待從server端TickerRespository回傳的JSON型別的序列化trade資料,這動作在client端起始時會完成。
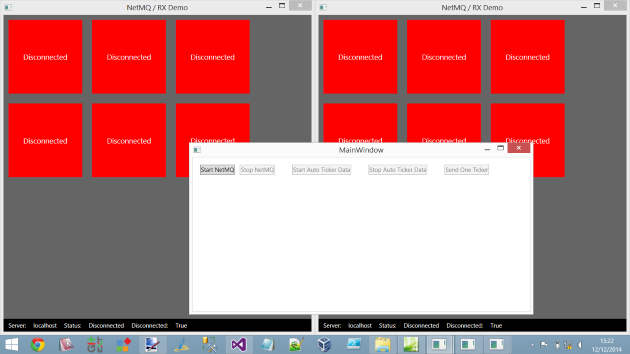
Simulating A Crash In The Publisher
這很簡單,只要按下MainWindow中的“Stop NetMQ”按鈕,這會執行以下程式,結束NetMQPublisher中的Actor。
public void Stop()
{
    actor.Dispose();
}然後應該發生的事是,任何已連線的客戶端在一段時間後會發覺server不存在且應顯示“DISCONNECTED”。
Restarting The Publisher
這很簡單,只要按下MainWindow中的“Start NetMQ”按鈕,這會執行以下程式:
private void StartServer()
{
    serverStarted = true;
    tickerPublisher.Start();
    AutoRunning();
}然後應該發生的事是,任何已連線的客戶端在一段時間後會發覺server已存在且不再顯示“DISCONNECTED”。
NetMQ Client
Client是一個標準的WPF應用程式,它也使用NetMQ。(…)
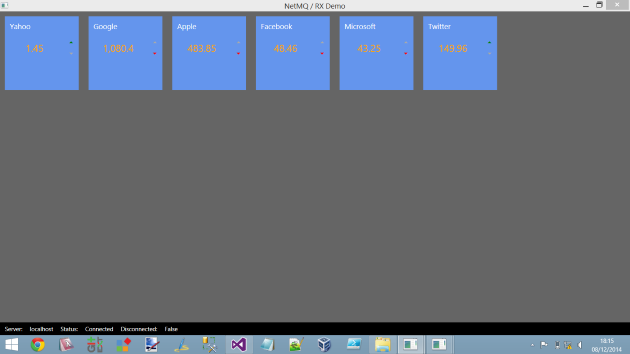
以下是同時執行多個client的圖示:
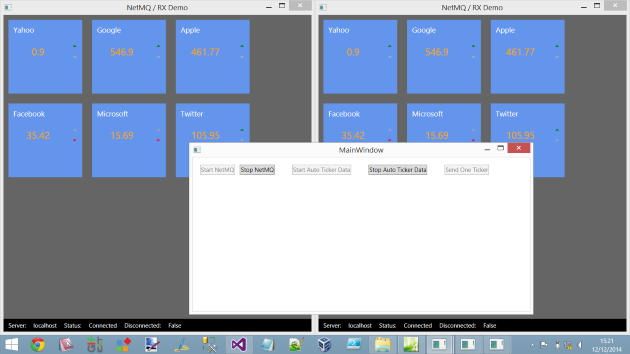
而這是在按下”Stop NetMQ”後呈現的狀況:
IOC
…
Clients
我們決定的架構是擁有Rx型別的client端,它會公開一個IObservable的串流以讓其它程式使用;在此IObservable中,我們會應用Observable.Create(...)的強大功能力來建立一個工廠,此工廠針對環境建立IObservable串流(透過呼叫/建立需要的NetMQ類型來滿足)。
(原文:The way we decided to structure things was to have a Rx’y type client which exposes a IObservable stream which the rest of the app can make use of. Within that IObservable we would use the power of Observable.Create(..) to create a factory that would create the IObservable stream for that scenario by calling into/creating the NetMQ classes required to forfill the stream requirements.)
所以在這demo程式中,一般的模式會像是:
XXXXClient會擁其它應用程式使用的IObservable串流,其內部會使用一個XXXXNetMQClient對NetMQserver通訊。
TickerClient/NetMQTickerClient
我們做了一個決定:對每一個非”HeartBeat“主題,在client和server間,我們會有一個專屬的client。就像我們在part 1中,每一個Hub型別都有一個專用的client proxy(譯者注:這裡應是原作者和它的part1 SignalR混淆了)。
NetMQTickerClient
The NetMQTickerClientis where all the client side NetMQ shennanigans is.在NetMQTickerClient中,client會使用NetMQ SubscriberSocket來訂閱”Trades”主題,如同之前所述,我們會使用NetMQ中的Actor框架。NetMQTickerClient使用一個RequestSocket對server執行快照的初始化,而NetMQ server會有一個ResponseSocket;Server會初始化TickerDtos的快照,然後會讓ticker stream可被應用程式使用。
NetMQTickerClient也在其OnError中做了一些錯誤處理,但主要偵測錯誤的方式仍是對HeartBeatClient的使用。
這邊是NetMQTickerClient的程式:
using System;
using System.Collections.Generic;
using System.Linq;
using System.Reactive.Disposables;
using System.Reactive.Linq;
using System.Reactive.Subjects;
using System.Text;
using System.Threading.Tasks;
using Client.Factory;
using Client.Comms.Transport;
using Common;
using NetMQ;
using NetMQ.Actors;
using NetMQ.InProcActors;
using NetMQ.Sockets;
using NetMQ.zmq;
using Newtonsoft.Json;
using Poller = NetMQ.Poller;

namespace Client.Comms
{
    public class NetMQTickerClient : IDisposable
    {
        private Actor<object> actor;
        private Subject<TickerDto> subject;
        private CompositeDisposable disposables = new CompositeDisposable();

        class ShimHandler : IShimHandler<object>
        {
            private NetMQContext context;
            private SubscriberSocket subscriberSocket;
            private Subject<TickerDto> subject;
            private string address;
            private Poller poller;
            private NetMQTimer timeoutTimer;

            public ShimHandler(NetMQContext context, Subject<TickerDto> subject, string address)
            {
                this.context = context;
                this.address = address;
                this.subject = subject;
            }

            public void Initialise(object state)
            {

            }

            public void RunPipeline(PairSocket shim)
            {
                // we should signal before running the poller but this will block the application
                shim.SignalOK();

                this.poller = new Poller();

                shim.ReceiveReady += OnShimReady;
                poller.AddSocket(shim);

                timeoutTimer = new NetMQTimer(StreamingProtocol.Timeout);
                timeoutTimer.Elapsed += TimeoutElapsed;
                poller.AddTimer(timeoutTimer);

                Connect();

                poller.Start();

                if (subscriberSocket != null)
                {
                    subscriberSocket.Dispose();
                }
            }

            private void Connect()
            {
                // getting the snapshot
                using (RequestSocket requestSocket = context.CreateRequestSocket())
                {

                    requestSocket.Connect(string.Format("tcp://{0}:{1}", address, SnapshotProtocol.Port));

                    requestSocket.Send(SnapshotProtocol.GetTradessCommand);

                    string json;

                    requestSocket.Options.ReceiveTimeout = SnapshotProtocol.RequestTimeout;

                    try
                    {
                        json = requestSocket.ReceiveString();
                    }
                    catch (AgainException ex)
                    {
                        // Fail to receive trades, we call on error and don't try to do anything with subscriber
                        // calling on error from poller thread block the application
                        Task.Run(() => subject.OnError(new Exception("No response from server")));
                        return;
                    }

                    while (json != SnapshotProtocol.EndOfTickers)
                    {
                        PublishTicker(json);

                        json = requestSocket.ReceiveString();
                    }
                }

                subscriberSocket = context.CreateSubscriberSocket();
                subscriberSocket.Subscribe(StreamingProtocol.TradesTopic);
                subscriberSocket.Subscribe(StreamingProtocol.HeartbeatTopic);
                subscriberSocket.Connect(string.Format("tcp://{0}:{1}", address, StreamingProtocol.Port));
                subscriberSocket.ReceiveReady += OnSubscriberReady;

                poller.AddSocket(subscriberSocket);

                // reset timeout timer
                timeoutTimer.Enable = false;
                timeoutTimer.Enable = true;
            }

            private void TimeoutElapsed(object sender, NetMQTimerEventArgs e)
            {
                // no need to reconnect, the client would be recreated because of RX

                // because of RX internal stuff invoking on the poller thread block the entire application, so calling on Thread Pool
                Task.Run(() => subject.OnError(new Exception("Disconnected from server")));
            }

            private void OnShimReady(object sender, NetMQSocketEventArgs e)
            {
                string command = e.Socket.ReceiveString();

                if (command == ActorKnownMessages.END_PIPE)
                {
                    poller.Stop(false);
                }
            }

            private void OnSubscriberReady(object sender, NetMQSocketEventArgs e)
            {
                string topic = subscriberSocket.ReceiveString();

                if (topic == StreamingProtocol.TradesTopic)
                {
                    string json = subscriberSocket.ReceiveString();
                    PublishTicker(json);

                    // reset timeout timer also when a quote is received
                    timeoutTimer.Enable = false;
                    timeoutTimer.Enable = true;
                }
                else if (topic == StreamingProtocol.HeartbeatTopic)
                {
                    // reset timeout timer
                    timeoutTimer.Enable = false;
                    timeoutTimer.Enable = true;
                }
            }

            private void PublishTicker(string json)
            {
                TickerDto tickerDto = JsonConvert.DeserializeObject<TickerDto>(json);
                subject.OnNext(tickerDto);
            }
        }

        public NetMQTickerClient(NetMQContext context, string address)
        {
            subject = new Subject<TickerDto>();

            this.actor = new Actor<object>(context, new ShimHandler(context, subject, address), null);
            this.disposables.Add(this.actor);

            this.disposables.Add(NetMQHeartBeatClient.Instance.GetConnectionStatusStream()
                .Where(x => x.ConnectionStatus == ConnectionStatus.Closed)
                .Subscribe(x =>
                    this.subject.OnError(new InvalidOperationException("Connection to server has been lost"))));
        }

        public IObservable<TickerDto> GetTickerStream()
        {
            return subject.AsObservable();
        }

        public void Dispose()
        {
            this.disposables.Dispose();
        }
    }
}
TickerClient
TickerClient可用於整個應用程式,以串流方式傳輸TickerDto物件,其中它簡單的從NetMQTickerClient包裝另一個串流。重要的部份是當出現錯誤且TickerRepository中的Repeat發生時,TickerClient IObservable訂閱會重新建立NetMQHeartBeatClient。這會確保NetMQHeartBeatClient會再次試著和server通訊一次。As before it all comes down to good housekeeping and lifestyle management.
以下是TickerClient的程式碼:
using System;
using System.Collections.Generic;
using System.Linq;
using System.Reactive.Disposables;
using System.Reactive.Linq;
using System.Text;
using System.Threading.Tasks;
using Client.Comms.Transport;
using Common;
using NetMQ;

namespace Client.Comms
{
    public class TickerClient : ITickerClient
    {
        private readonly NetMQContext context;
        private readonly string address;

        public TickerClient(NetMQContext context, string address)
        {
            this.context = context;
            this.address = address;
        }

        public IObservable<TickerDto> GetTickerStream()
        {
            return Observable.Create<TickerDto>(observer =>
            {
                NetMQTickerClient client = new NetMQTickerClient(context, address);

                var disposable = client.GetTickerStream().Subscribe(observer);
                return new CompositeDisposable { client, disposable };
            })
            .Publish()
            .RefCount();
        }


        public IObservable<ConnectionInfo> ConnectionStatusStream()
        {
            return Observable.Create<ConnectionInfo>(observer =>
            {
                NetMQHeartBeatClient.Instance.InitialiseComms();

                var disposable = NetMQHeartBeatClient.Instance.
                    GetConnectionStatusStream().Subscribe(observer);

                return new CompositeDisposable { disposable };
            })
            .Publish()
            .RefCount();
        }
    }
}
HeartBeatClient / NetMQHeartBeatClient
We took the decision that the heartbeat between a single client and the server is a global concern in the context of that client.
因此,我們僅預期只會有單一個HeartBeatClient(籍由IOC註冊來達成),並且NetMQHeartBeatClient僅存在單一實體。
NetMQHeartBeatClient
The NetMQHeartBeatClient is where all the client side NetMQ shennanigans is.在NetMQHeartBeatClient中,client會使用NetMQ SubscriberSocket來訂閱”HeartBeat (HB)”主題。如同之前我們使用了NetMQ中的Actor框架,這也是我們預期在一段時間後會從server端的PublisherSocket得到的回應,如果沒有回應的話,我們會認為通訊發生問題,其中我們使用Rx的Subject<T>的OnNext來推送相關的ConnectionInfo/ConnectionStatus。
這邊是NetMQHeartBeatClient的程式碼:
using System;
using System.Collections.Generic;
using System.Linq;
using System.Reactive.Linq;
using System.Reactive.Subjects;
using System.Text;
using System.Threading;
using System.Threading.Tasks;
using Client.Factory;
using Client.Comms.Transport;
using Common;
using NetMQ;
using NetMQ.Actors;
using NetMQ.InProcActors;
using NetMQ.Sockets;
using NetMQ.zmq;
using Newtonsoft.Json;
using Poller = NetMQ.Poller;

namespace Client.Comms
{
    public class NetMQHeartBeatClient
    {
        private readonly NetMQContext context;
        private readonly string address;
        private Actor<object> actor;
        private Subject<ConnectionInfo> subject;
        private static NetMQHeartBeatClient instance = null;
        private static object syncLock = new object();
        protected int requiresInitialisation = 1;

        class ShimHandler : IShimHandler<object>
        {
            private NetMQContext context;
            private SubscriberSocket subscriberSocket;
            private Subject<ConnectionInfo> subject;
            private string address;
            private Poller poller;
            private NetMQTimer timeoutTimer;
            private NetMQHeartBeatClient parent;

            public ShimHandler(NetMQContext context, Subject<ConnectionInfo> subject, string address)
            {
                this.context = context;
                this.address = address;
                this.subject = subject;
            }

            public void Initialise(object state)
            {
                parent = (NetMQHeartBeatClient) state;
            }

            public void RunPipeline(PairSocket shim)
            {
                // we should signal before running the poller but this will block the application
                shim.SignalOK();

                this.poller = new Poller();

                shim.ReceiveReady += OnShimReady;
                poller.AddSocket(shim);

                timeoutTimer = new NetMQTimer(StreamingProtocol.Timeout);
                timeoutTimer.Elapsed += TimeoutElapsed;
                poller.AddTimer(timeoutTimer);

                Connect();

                poller.Start();

                if (subscriberSocket != null)
                {
                    subscriberSocket.Dispose();
                }
            }

            private void Connect()
            {
                subscriberSocket = context.CreateSubscriberSocket();
                subscriberSocket.Subscribe(StreamingProtocol.HeartbeatTopic);
                subscriberSocket.Connect(string.Format("tcp://{0}:{1}", address, StreamingProtocol.Port));

                subject.OnNext(new ConnectionInfo(ConnectionStatus.Connecting, this.address));
                subscriberSocket.ReceiveReady += OnSubscriberReady;
                poller.AddSocket(subscriberSocket);

                // reset timeout timer
                timeoutTimer.Enable = false;
                timeoutTimer.Enable = true;
            }

            private void TimeoutElapsed(object sender, NetMQTimerEventArgs e)
            {
                // no need to reconnect, the client would be recreated because of RX

                // because of RX internal stuff invoking on the poller thread block
                // the entire application, so calling on Thread Pool
                Task.Run(() =>
                {
                    parent.requiresInitialisation = 1;
                    subject.OnNext(new ConnectionInfo(ConnectionStatus.Closed, this.address));
                });
            }

            private void OnShimReady(object sender, NetMQSocketEventArgs e)
            {
                string command = e.Socket.ReceiveString();

                if (command == ActorKnownMessages.END_PIPE)
                {
                    poller.Stop(false);
                }
            }

            private void OnSubscriberReady(object sender, NetMQSocketEventArgs e)
            {
                string topic = subscriberSocket.ReceiveString();

                if (topic == StreamingProtocol.HeartbeatTopic)
                {
                    subject.OnNext(new ConnectionInfo(ConnectionStatus.Connected, this.address));

                    // reset timeout timer
                    timeoutTimer.Enable = false;
                    timeoutTimer.Enable = true;
                }
            }
        }

        private NetMQHeartBeatClient(NetMQContext context, string address)
        {
            this.context = context;
            this.address = address;
            InitialiseComms();
        }

        public static NetMQHeartBeatClient CreateInstance(NetMQContext context, string address)
        {
            if (instance == null)
            {
                lock (syncLock)
                {
                    if (instance == null)
                    {
                        instance = new NetMQHeartBeatClient(context,address);
                    }
                }
            }
            return instance;
        }

        public void InitialiseComms()
        {
            if (Interlocked.CompareExchange(ref requiresInitialisation, 0, 1) == 1)
            {
                if (actor != null)
                {
                    this.actor.Dispose();
                }

                subject = new Subject<ConnectionInfo>();
                this.actor = new Actor<object>(context, new ShimHandler(context, subject, address), this);
            }
        }

        public IObservable<ConnectionInfo> GetConnectionStatusStream()
        {
            return subject.AsObservable();
        }

        public static NetMQHeartBeatClient Instance
        {
            get { return instance; }
        }
    }
}
HeartBeatClient
HeartBeatClient對整個程式公開,它單純的從NetMQHeartBeatClient中包裝了另一個stream,且可能被用在client與server間連線狀態的溝通。重要的部份是當出現錯誤且NetMQHeartBeatClient中的Repeat發生時,HeartBeatClient訂閱會重新建立。這會確保NetMQHeartBeatClient會再次試著和server通訊一次。As before it all comes down to good housekeeping and lifestyle management.
這邊是HeartBeatClient 的程式碼:
using System;
using System.Collections.Generic;
using System.Linq;
using System.Reactive.Disposables;
using System.Reactive.Linq;
using System.Text;
using System.Threading.Tasks;
using Client.Comms;
using Client.Comms.Transport;
using NetMQ;

namespace Client.Comms
{
    public class HeartBeatClient : IHeartBeatClient
    {
        public IObservable<ConnectionInfo> ConnectionStatusStream()
        {
            return Observable.Create<ConnectionInfo>(observer =>
            {
                NetMQHeartBeatClient.Instance.InitialiseComms();

                var disposable = NetMQHeartBeatClient.Instance
                    .GetConnectionStatusStream().Subscribe(observer);

                return new CompositeDisposable { disposable };
            })
            .Publish()
            .RefCount();
        }
    }
}
TickerRepository
TickerRepository是Observable鏈結上的下一部份, 那它看起來像什麼呢?它實際上是另人訝異的簡單,但不要被愚弄了,它其實做了很多。
using System;
using System.Collections.Generic;
using System.Linq;
using System.Reactive.Linq;
using Client.Factory;
using Client.Comms;

namespace Client.Repositories
{
    class TickerRepository : ITickerRepository
    {
        private readonly ITickerClient tickerClient;
        private readonly ITickerFactory tickerFactory;

        public TickerRepository(ITickerClient tickerClient, ITickerFactory tickerFactory)
        {
            this.tickerClient = tickerClient;
            this.tickerFactory = tickerFactory;
        }

        public IObservable<Ticker> GetTickerStream()
        {
            return Observable.Defer(() => tickerClient.GetTickerStream())
                .Select(tickerFactory.Create)
                .Catch<Ticker>(Observable.Empty<Ticker>())
                .Repeat()
                .Publish()
                .RefCount();
        }
    }
}
所以這裡到底做了什麼?
- 我們使用
Observable.Defer,因此實際上我們沒有使用內部的串流,直到某人訂閱了由Observable.Defer所建立的IObservable串流,這是讓Hot串流變成Cold串流的方式。 - 我們使用Select以將串流資料從
TickerDto轉成Ticker - 我們使用Catch補捉串流中的任何例外(OnError),且在其中使用預設值
- 我們使用Repeat,注意這個很很很重要!這讓我們可以重覆整個串流,包含再次連線至server端。This along with the resilient stream logic are the MOST important bits to the app (at least in my opinion)
- 我們使用Publish來共用內部的串流
- 我們使用RefCount以在沒有訂閱者時自動disposal
現在我們已經看到了repository,在學習TickerStream的IObservable的旅途中只剩下一個部份了,讓我們來看看吧。
TickersViewModel
TickersViewModel呈現了螢幕上所看到的所有Ticker們,這個viewmodel使用了TickerRepository提供的lazy / repeatable / resilient IObservable,讓我們看看這段我覺得很易讀的程式碼:
using System;
using System.Collections.Generic;
using System.Collections.ObjectModel;
using System.Linq;
using System.Reactive.Linq;
using System.Text;
using System.Threading.Tasks;
using System.Windows.Input;
using Client.Factory;
using Client.Repositories;
using Client.Services;
using Common;
using Common.ViewModels;
using log4net;


namespace Client.ViewModels
{
    public class TickersViewModel : INPCBase
    {
        private readonly ITickerRepository tickerRepository;
        private readonly IConcurrencyService concurrencyService;
        private bool stale = false;
        private static readonly ILog log = LogManager.GetLogger(typeof(TickersViewModel));

        public TickersViewModel(IReactiveTrader reactiveTrader,
                                IConcurrencyService concurrencyService,
            TickerViewModelFactory tickerViewModelFactory)
        {
            Tickers = new ObservableCollection<TickerViewModel>();
            Tickers.Add(tickerViewModelFactory.Create("Yahoo"));
            Tickers.Add(tickerViewModelFactory.Create("Google"));
            Tickers.Add(tickerViewModelFactory.Create("Apple"));
            Tickers.Add(tickerViewModelFactory.Create("Facebook"));
            Tickers.Add(tickerViewModelFactory.Create("Microsoft"));
            Tickers.Add(tickerViewModelFactory.Create("Twitter"));
            this.tickerRepository = reactiveTrader.TickerRepository;
            this.concurrencyService = concurrencyService;
            LoadTrades();
        }

        public ObservableCollection<TickerViewModel> Tickers { get; private set; }

        private void LoadTrades()
        {
            tickerRepository.GetTickerStream()
                            .ObserveOn(concurrencyService.Dispatcher)
                            .SubscribeOn(concurrencyService.TaskPool)
                            .Subscribe(
                                AddTicker,
                                ex => log.Error("An error occurred within the trade stream", ex));
        }

        private void AddTicker(Ticker ticker)
        {
            Tickers.Single(x => x.Name == ticker.Name)
                 .AcceptNewPrice(ticker.Price);
        }
    }
}而每個Ticker是由單一個TickerViewModel所呈現的,如下程式所示。其中你也可以看到我們之前談論到的ConnectionStatusStream IObservable,這是用來讓TickerViewModel在斷線時顯示一個紅色的”DISCONNECTED“狀態框,稍後會談到這個。
using System;
using System.Collections.Generic;
using System.Linq;
using System.Reactive.Linq;
using System.Text;
using System.Threading.Tasks;
using Client.Comms.Transport;
using Client.Services;
using log4net;

namespace Client.ViewModels
{
    public class TickerViewModel : INPCBase
    {
        private decimal price;
        private bool isUp;
        private bool stale;
        private bool disconnected;
        private static readonly ILog log = LogManager.GetLogger(typeof(TickerViewModel));


        public TickerViewModel(
            IReactiveTrader reactiveTrader,
            IConcurrencyService concurrencyService,
            string name)
        {

            this.Name = name;

            reactiveTrader.ConnectionStatusStream
                .ObserveOn(concurrencyService.Dispatcher)
                .SubscribeOn(concurrencyService.TaskPool)
                .Subscribe(
                    OnStatusChange,
                    ex => log.Error("An error occurred within the connection status stream.", ex));
        }


        public string Name { get; private set; }


        public void AcceptNewPrice(decimal newPrice)
        {
            IsUp = newPrice > price;
            Price = newPrice;
        }


        public decimal Price
        {
            get { return this.price; }
            private set
            {
                this.price = value;
                base.OnPropertyChanged("Price");
            }
        }

        public bool IsUp
        {
            get { return this.isUp; }
            private set
            {
                this.isUp = value;
                base.OnPropertyChanged("IsUp");
            }
        }

        public bool Stale
        {
            get { return this.stale; }
            set
            {
                this.stale = value;
                base.OnPropertyChanged("Stale");
            }
        }

        public bool Disconnected
        {
            get { return this.disconnected; }
            set
            {
                this.disconnected = value;
                base.OnPropertyChanged("Disconnected");
            }
        }


        private void OnStatusChange(ConnectionInfo connectionInfo)
        {

            switch (connectionInfo.ConnectionStatus)
            {
                case ConnectionStatus.Connecting:
                    Disconnected = true;
                    break;
                case ConnectionStatus.Connected:
                    Disconnected = false;
                    break;
                case ConnectionStatus.Closed:
                    Disconnected = true;
                    break;
                default:
                    throw new ArgumentOutOfRangeException();
            }
        }

    }
}可以看到這個ViewModel使用IReactiveTrader.ConnectionStatusStream來監看對NetMQPublisher的連線狀態,這部份的程式職責在顯示價格及斷線的狀態,斷線狀態則是由Disconnected屬性持有。
ConnectivityStatusViewModel
最後一件我想說明的是ConnectionStatusStream如何被使用。當HeartBeatClient推送新值時這個串流的OnNexts會被呼叫,所以我們可以看到像是連線中,已連線、關閉等狀態,所有的變化都是來自我們之前討論的NetMQHeartBeatClient其中的邏輯,並使用標準Rx中的Subject<T>將之轉換成IObservable串流。
如下是整個程式中ConnectivityStatusViewModel所顯示在下方狀態列的資訊。

using System;
using System.Collections.Generic;
using System.Linq;
using System.Reactive.Linq;
using System.Text;
using System.Threading.Tasks;
using Client.Comms.Transport;
using Client.Services;
using log4net;

namespace Client.ViewModels
{
    public class ConnectivityStatusViewModel : INPCBase
    {
        private static readonly ILog log = LogManager.GetLogger(typeof(ConnectivityStatusViewModel));
        private string server;
        private string status;
        private bool disconnected;

        public ConnectivityStatusViewModel(
            IReactiveTrader reactiveTrader,
            IConcurrencyService concurrencyService)
        {
            reactiveTrader.ConnectionStatusStream
                .ObserveOn(concurrencyService.Dispatcher)
                .SubscribeOn(concurrencyService.TaskPool)
                .Subscribe(
                OnStatusChange,
                ex => log.Error("An error occurred within the connection status stream.", ex));
        }


        private void OnStatusChange(ConnectionInfo connectionInfo)
        {
            Server = connectionInfo.Server;

            switch (connectionInfo.ConnectionStatus)
            {
                case ConnectionStatus.Connecting:
                    Status = "Connecting...";
                    Disconnected = true;
                    break;
                case ConnectionStatus.Connected:
                    Status = "Connected";
                    Disconnected = false;
                    break;
                case ConnectionStatus.Closed:
                    Status = "Disconnected";
                    Disconnected = true;
                    break;
                default:
                    throw new ArgumentOutOfRangeException();
            }
        }

        public string Server
        {
            get { return this.server; }
            set
            {
                this.server = value;
                base.OnPropertyChanged("Server");
            }
        }

        public string Status
        {
            get { return this.status; }
            set
            {
                this.status = value;
                base.OnPropertyChanged("Status");
            }
        }

        public bool Disconnected
        {
            get { return this.disconnected; }
            set
            {
                this.disconnected = value;
                base.OnPropertyChanged("Disconnected");
            }
        }
    }
}
That’s It For Now
Anyway that is all I wanted to say for now, I hope you have enjoyed this very mini RX/SignalR/NetMQ series, and that this has maybe made you want to go away and have a play with RX/SignalR/NetMQ. If you have enjoyed it, please feel to free to leave a vote or a comment, Doron and I have worked quite hard on these demos, to try and iron out any bugs and make them as real world as possible, so comments/votes are always nice to receive.
Written with StackEdit.